Hi all!!
Time for a brand new challenge at Love to Create! And the theme we have this week is perfect for me, LOVE OF RIBBON! Well, I love ribbon, so no problem for me! Our sponsor for this challenge is Sami Stamps, and they are offering a $12 gift certificate to the shop. Isn't that great? Just click on the banner below to visit the shop!
Sami Stamps also generously provided some images to the DT to work with, and here is what I created.
The papers I used for my card are from an old paper pad from My Minds Eye. I just love the shade of blue in this pad!
The image I used for my card is generously sponsored by Sami Stamps. This one is called Wild Flower Beauty, and can be found here, I used my Copic Markers again to color the image, and i used the following.
Skin: E000, E00, E11, E13 and E93 for blush
Hair: E50, E51, E53, E55, E57
Shirt: Y21, Y28
Flowers: BG05, BG07, Y21, Y28
The ribbon I used is from JoyCrafts, and the flowers are by Prima Marketing. The brads are from my stash.
This is it for today, I hope you like it. Please pop over to Love to Create and join us!
Hugs,
Sandra
maandag 29 september 2014
Art by Mi Ran - X-MAS
Hi all!
Hope you all had a great weekend! Mine was awesome, as I celebrated my birthday, and today is THE big day! Happy birthday to me!!!
Today is also my turn to host on the Art by Mi Ran blog, so here is my card!
The papers I used for my card are from Carte Bella, and I made a 13,5cm square card with it. I used a sketch from Tiets' club to make my card.
The stamp I used is called Santa's Helper. She is available as a rubberstamp via Treasured Times Rubber Stamps. You can find her here.
The image is colored with my Copic Markers, and I used the following.
Skin: E000, E00, E11, E13, and E93 for blush
Eyes: G43, G46
Hair: E71, E74, E77, E79
Dress: R24, R27, R29
Sleigh: E77, E79, G43, G46
The flowers I used are from Wild Orchid Crafts, except for the berries. I think they are from Magnolia, but I am not 100% certain about it.
The sentiment is created using the Typewriter Keys stamps from Noor!Design, and I used Versafine Onyx Black ink to stamp it.
This was it for now, there will be another post later today. I hope you liked my card, and see you around later today!
Hugs, Sandra
zondag 28 september 2014
ROBYN'S FETISH CHALLENGE #231 - ORIENTAL
Hi all!!
Welcome to a brand new challenge at Robyn's Fetish! This week our challenge theme is ORIENTAL! Our sponsor for this challenge is NiceCrane Designs, and they are offering a $20 gift certificate to their shop! Just click on the banner below to visit the shop.
Nicecrane Designs also provided some images to the DT to work with, and this is what I created.
The image I used is from a set called Pictures of Japan, and can be found here. I used normal markers to color the image, so no blending at all.
This was it for today, I hope you all like it. Please pop over to Robyn's Fetish and join us!
Hugs, Sandra
Welcome to a brand new challenge at Robyn's Fetish! This week our challenge theme is ORIENTAL! Our sponsor for this challenge is NiceCrane Designs, and they are offering a $20 gift certificate to their shop! Just click on the banner below to visit the shop.
Nicecrane Designs also provided some images to the DT to work with, and this is what I created.
The papers I used are from Robyn's Fetish. The pack is called Oriental Beauty, and can be found here. All edges are inked with Distress Ink Walnut Stain. The flowers I used are from my stash. They are cherry blossoms, so they are perfect for an oriental themed project!
This was it for today, I hope you all like it. Please pop over to Robyn's Fetish and join us!
Hugs, Sandra
dinsdag 23 september 2014
Copic Marker Benelux - Bookcard with gift envelope
Hallo allemaal
Hi all!
Hi all!
Afgelopen zaterdag vierde mijn schoonzus haar verjaardag en ik kon natuurlijk niet met lege handen aankomen. Daarom heb ik een boekkaart met een cadeau envelopje gemaakt, dat maakt geld geven toch wat leuker dan een saaie witte envelop.
Last weekend my SIL celebrsted her birthday, and I couldn't arrive empty-handed. So I made her a bookcard with a gift envelope.
Het papier dat ik heb gebruikt is van Prima Marketing.
De afbeelding die ik heb gebruikt is een rubber stempel van LDRS, ze heet Breeze. Natuurlijk heb ik mijn Copic Markers weer gebruikt. Ik heb met mijn kleurenkaart gekeken welke kleuren er in het papier zaten, en daarbij kwam ik uit op de volgende kleuren
The papers I used are by Prima Marketing. The image I used is called Breeze, by Little Darlings Rubber Stamps. I took my Copic Color Chart and picked colors that are in the papers I was going to use.
Huid/Skin: E000, E00, E11, E13
Wangen/Cheeks: E93
Haar/Hair: W3, W5, W7
Ogen/Eyes: BG93, BG96
Lippen/Lips: V95, V99
Jurk/Dress: BG90, BG93, BG96, BG99, V91, V93, V95, V99
De bloemetjes die ik heb gebruikt zijn een mix van verschillende merken. Dit zijn de kleuren die ook in het papier terug komen, zodat alles mooi bij elkaar past.
The flowers I used are a mix of different brands. These are also the colors that are in the papers, so everything matches.
Dit is de binnenkant van de kaart. Zoals je kan zien, zit er aan de linkerkant een label in de pocket, waar je je naam op kan zetten. Rechts (in het "boek" gedeelte) zit het cadeau-envelopje
This is the inside of the card. On the left is a tag to write a message to the recepient, and on the right is the gift envelope
En nog even een los fotootje van het cadeau-envelopje. Ik heb hiervoor gebruik gemaakt van een mal van Dutch Doobadoo. Als sluiting heb ik klittenband gebruikt, dan blijft hij goed gesloten.
And a close-up fron the gift envelope. I used a template from Dutch Doobadoo to make it. To close is I used some velcro.
Dit was het weer voor vandaag, ik hoop dat ik jullie heb kunnen inspireren!
Fijne week gewenst!
This was it for today, I hope I was able to inspire you. Have a great week!
I would love to enter the following challenges:
The ABC Challenge - Tic Tac Toe (Flowers, Lace, Dies)
Copic Marker Spain - Anything goes
Creatalicious Challenge - Flower Power
Deep Ocean Challenge - More than 1 flower
Dream Valley Challenge - Lace and Ribbon
Love to Scrap Challenge - Anything goes
Stamp and Create - Circles or dots
Liefs/Hugs, Sandra
maandag 22 september 2014
Love to Create - Fussycutting
Hi all!
It is Monday again, and you know what that means, right? Another new challenge at Love to Create!! This week we want to see some fussycutting on your project!
Our sponsor this weeks is StampArt Design by Kathryne, and she is offering 5 images of the winner's choice. Isn't that generous? Just click on the banner below to visit her shop.
StampArt Design also generously provided images to the DT to work with, and this is what I created.
The papers I used are by Glitz Design, and have been in my stash for ages. I decided to pull them out so I could use them more often.
The image I used is called Elphie the Elephant, and can be found here. Of course I used my Copic Markers again to color her, and I used the following.
Skin: C00, C0, C2, C5
Nails: C00, C1
Ears: R11, R22
Officially there is a butterfly in the image, but while fussycutting I accidentally threw it away. Of course I wanted to use the butterfly, so I decided to diecut one from the designer papers.
This was it for today, I hope you like it. Please pop by at Love to Create and join us!
Hugs, Sandra
zaterdag 20 september 2014
Sisterhood of Snarky Stampers GDT - Distressing
Hi all!!
I have some great news to share! Two weeks back I was crowned Queen of Snark, at Sisterhood of Snarky Stampers, and I got to be their guest designer! Well, today is the day!
I made a standard size rectangular card, using a My Minds Eye paper pad, I used some yellow ribbon from JoyCrafts, and some yellow rhinestones from Euroland (kind of a dollarshop)
The image I used is from a new line from The Stamping Chef, and this girl is called Tess. Tess is inspired by my little daughter Tessa, and I am so proud of it! Thanks again Tamara!
This image is called NO! Buy your own! and can be found here.
I used my Copic Markers again to color her, and I used the following.
Skin: E000, E00, E11, E13, and E93 for blush
Hair: E51, E53, E55
Dress: R22, R24, R27, R29
Shoes: BG05, BG07, BG09
Jewelry: Y21, Y28
Here's a close-up of the distressing. All edges are distressed with a Tim Holtz tool, and inked with Distress Ink Black Soot.
This was it for today, I hope you all like it and will pop over to Sisterhood of Snarky Stampers and join!
Hugs, Sandra
I have some great news to share! Two weeks back I was crowned Queen of Snark, at Sisterhood of Snarky Stampers, and I got to be their guest designer! Well, today is the day!
The theme for this challenge is Distressing, and I absolutely love that!
Here's the project I made!I made a standard size rectangular card, using a My Minds Eye paper pad, I used some yellow ribbon from JoyCrafts, and some yellow rhinestones from Euroland (kind of a dollarshop)
The image I used is from a new line from The Stamping Chef, and this girl is called Tess. Tess is inspired by my little daughter Tessa, and I am so proud of it! Thanks again Tamara!
This image is called NO! Buy your own! and can be found here.
I used my Copic Markers again to color her, and I used the following.
Skin: E000, E00, E11, E13, and E93 for blush
Hair: E51, E53, E55
Dress: R22, R24, R27, R29
Shoes: BG05, BG07, BG09
Jewelry: Y21, Y28
Here's a close-up of the distressing. All edges are distressed with a Tim Holtz tool, and inked with Distress Ink Black Soot.
This was it for today, I hope you all like it and will pop over to Sisterhood of Snarky Stampers and join!
Hugs, Sandra
vrijdag 19 september 2014
Crea-Sandra's Crafty Tutorial World - Creating a Water card
Hi all!
I have a new tutorial for you all! Today, I would like to show you how to create a water card. It is an easy technique and is especially attractive to children.
Supplies.
Robyn's Fetish image Starfish on a Rock
Robyn's Fetish image Miss Goldie
Blue shower gel, hair gel or shampoo
Small Ziplock bag
Plastic spoon
Strong double sided tape
Any coloring medium of your choice (I used Copic Markers)
Ruler
Any materials you need to finish your card
Color your image like you want to and trim it down. It has to be a little bit narrower than the width of your ziplock bag.
Squirt a little bit of liquid in the ziplock bag; about a teaspoon is enough.
Put strong double sided tape on the bottom and both sides of the back of the image.
Take a ruler and press all of the liquid upwards, for about 1/4 inch. The empty part will be adhered to the image.
Adhere the bottom of the ziplock bag to the bottom back of your colored image
While adhering my ziplock bag, I found there was too much liquid in it, so I took a plastic spoon, and took some out.
Press the liquid down and fold over the top of the ziplock bag over your image panel.
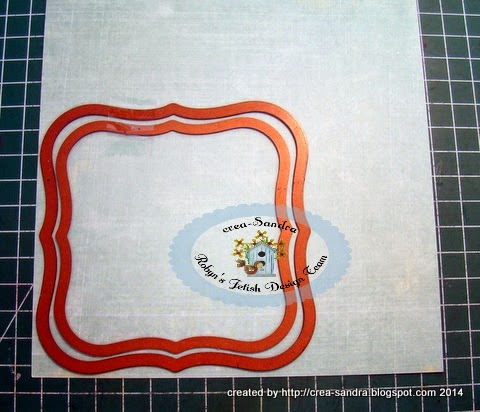
Cut a frame that is about the same size of your image panel. I decided I wanted to have this frame, but you can also cut one by hand.
Adhere it on top of the ziplock bag
If there are parts of the ziplock bag peeking out underneath the frame, you can adhere it down on the back so that you can't see it anymore. Now your waterpiece is finished and you can assemble the rest of your card.
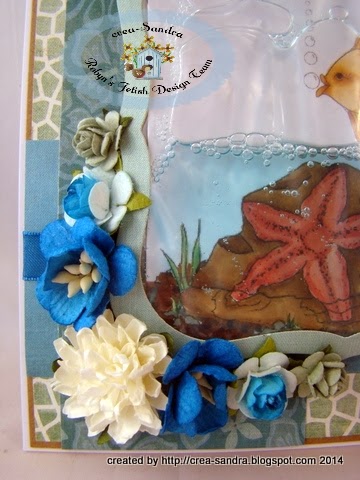
And here is my finished card and some close-up pictures.
This was it for today, I hope you like it and will give it a try!
Hugs,
Sandra
maandag 15 september 2014
Love to Create - Add some lines
***THIS IS MY SECOND POST FOR TODAY, PLEASE MAKE SURE TO SCROLL DOWN TO SEE THE FIRST!!! ***
Hi all!
How are you all doing? Hope you had a great weekend! Mine was not that good, I have been in bed with food poisoning all weekend... I must have eaten something wrong, cause both me and hubby were sick... :(
Anyway, I feel much better now, so time to bother you with a new challenge at Love to Create!! Our theme this week is Add some lines. Our sponsor for this challenge is Stitchy Bear! Just click on the banner below to go to the shop!
Stitchy Bear also generously provided some images to the DT to work with, and this is what I created.
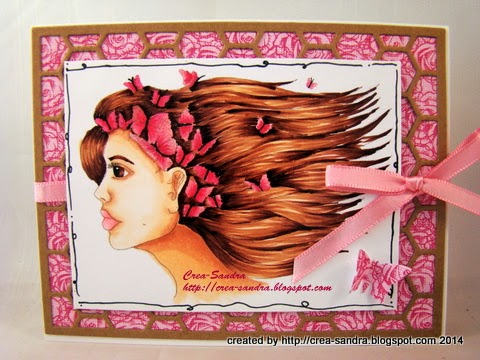
I printed the image quite large, so I kept the rest of my card pretty simple. I used some paper from Wild Rose Studio, and on top of that I used an MFT chicken wire diecut from kraft cardstock.
The image I used is called Butterfly Profile, from AliPeeps, who is one of Stitchy Bears' designers. The image can be found here. I used my Copic Markers again to color the image, and I used the following.
Skin: E000, E00, E11, E13 and R20 for the cheeks and lips.
Hair: E21, E23, E25, E27, E29
Eye: E23, E27
Butterflies: RV21, RV23, RV25, RV29
I also added some doodled lines around the image, to make my card match our challenge theme.
As a final touch I added a piece of pink ribbon, and I punched a butterlfy from the same paper as my background,
This was it for today, I hope you all like it. Please pop over to Love to Create and join us!
Hugs, Sandra
Art by Mi Ran Tutorial - Creating a scene behind a colored image
Hi all!
I have a very special post with you to share today, because this is the first official Art by MiRan tutorial!
I would like to show you all, how to create a little scene behind a coloured image. Believe me, this sounds harder than it is!
Supplies:
- Colored image
(I used Stephanie brings a surprise, which is only available when you are subscribed to Through the Craft Room door Magazine)
- Ruler
- Copic Multiliner
- Grey, Green and Blue alcohol markers.
(I used Stephanie brings a surprise, which is only available when you are subscribed to Through the Craft Room door Magazine)
- Ruler
- Copic Multiliner
- Grey, Green and Blue alcohol markers.
Take your ruler, and draw a horizontal line with your Copic Multiliner. Twist the image, and draw some oblique lines, to create a pavement.
Accent the lines with a Copic Marker C7, and blend it out with C5 and C3. Now your pavement is
ready.
ready.
Start scribbling some bushes above the pavement with G46, and make some scribbles in the bushes too. Blend it out with your G43, and your bushes are finished.
Now we want to create a sky, so take your BG10 marker and draw some clouds. Blend them out on the outside line with your BG000. Do not blend inside the cloud. Now color the full sky with BG0000, and your background is finished
And here is my finished card, and a close up of the image.
The papers I used for this card are by My Minds Eye. All edges are inked with Distress Ink Vintage Photo. The yellow ribbon is by Joy!Craftss. All flowers are by Wild Orchid Crafts, except for the large white ones, they are from Joy!Crafts.
I used the following Copic Markers:
Skin: E00, E11, E13, R20 for blush
Hair: E23, E25, E27
Dress: Y11, Y15, Y17, R81, R83, R85
Pavement: C3, C5, C7
Bushes: G43, G46
Sky: BG10, BG000, BG0000
This was it for today, I hope you all like it! If there are any questions about the tutorial, please ask!
Hugs, Sandra
Abonneren op:
Posts (Atom)