Pagina's

Posts tonen met het label MFT. Alle posts tonen

woensdag 13 maart 2019

Anreda DT - Hieperdepiep

Hoi allemaal,

Vandaag laat ik jullie een mannenkaart zien die ik voor Anreda heb gemaakt. En nou hoor ik je denken; dat vind ik toch zo lastig! Nou, ik kan je vertellen dat ik dat ook lastig vind! Maar, denk dat niet langer, ik heb namelijk de oplossing!

 Want zeg nou zelf, dit is best een mannelijke kaart, toch? Weet je wat mijn geheim is?
Studio Light Denim Saturdays papier, in combinatie met een Craft Emotions stempel! Wat stansjes erbij, stukje ribbelkarton en een stuk touw, en klaar is je mannenkaart!


 De stempel heb ik met Distress Oxide in de kleuren Lucky Clover en Blueprint Sketch op een stukje designpapier gestempeld.


 Ik heb een hele oude stans van Noor Design gebruikt, zowel voor de fotostrip. als de noteblock rand.


De grote cirkels zijn gestanst met een hele oude stans van My Favorite Things, de kleinere, onderste cirkels met een stans van Craft Emotions.

Dit was het voor vandaag, ik hoop dat jullie het leuk vonden!

Liefs, Sandra

vrijdag 18 januari 2019

Jaliyah

Hoi allemaal!

Dochterlief had afgelopen weekend weer een kinderfeestje, en vroeg direct of ik weer een tasje wilde maken waar het cadeautje in kon. Uiteraard slaan we dat niet af, dus ik heb lekker zitten knutselen.

 Het tasje is een krafttasje van Kimya, mijn favoriete winkel als het om verpakkingsmaterialen gaat. Het achtergrond papier is van een blok van de Action. De naam van de jarige heb ik gestempeld op kraftpapier, met de scrabble letters van Noor!Design. Ook de Hiep hiep hoera stempel en de Gefeliciteerd zijn van Noor Design.


De stempels die ik heb gebruikt zijn van MFT. Saddle Up and Celebrate heet deze set. Ik heb ze gekleurd met mijn Copic Markers, maar niet opgeschreven welke nummers ik heb gebruikt. Die moet ik jullie dan ook schuldig blijven.
De achtergrond is gemaakt met een setje waterverf van de Action. Niet helemaal mijn ding, maar ach...

Om mijn tasje af te maken, moesten er volgens dochterlief wat glow-in-the-dark parels op. Die heb ik ooit op het eerste tasje dat ik maakte gedaan, en dat hoort er volgens haar bij. De pareltjes zijn gemaakt met de Nuvo Glow drops, in de kleuren Blue Crush, Apple Sour en Shocking Pink.

Dit was het voor vandaag, ik hoop dat jullie het leuk vonden!

Liefs, Sandra

vrijdag 7 september 2018

Justus

Hoi allemaal!

De scholen zijn allemaal weer begonnen, en daarmee kreeg dochterlief ook al gelijk een uitnodiging voor een kinderfeestje. Dat betekende natuurlijk ook gelijk weer dat mams aan de slag mocht, vervelend he? Haha, neeeeeee, natuurlijk niet! 

 Ik heb weer een tasje van Kimya gepimpt.  Eerst heb ik met het Word Punch Board van We R Memory Keepers de naam van de jarige geponst uit roze cardstock. Ik kreeg van zijn moeder door dat hij van roze houd, dus dan houden we daar gewoon rekening mee, toch?


 Voor mijn achtergrond heb ik een stukje Bristol Smooth cardstock gebruikt en daarop met Distress Oxides kleur aangebracht. Ik gebruikte Salty Ocean, Wilted Violet en Picked Raspberry. Daarna ben ik er met Distress Ink in Black Soot overheen gegaan, om alles donkerder te maken. Vervolgens heb ik de achtergrond gesprayd met water, en daarna witte gesso erover heen gespetterd, en toen leek het precies op de ruimte!
De stempelset die ik heb gebruikt, is van My Favorite Things, en hij heet Space Explorer. Ik heb een tekst op de achtergrond geembost met witte embossingpoeder. De stempels heb ik met mijn Copic Markers gekleurd, ik gebruikte de volgende markers.

Huid: E0000, E000, E00, E21, E11, E13, R22
Haar: E55, E57
Pak: C00, C1, C3, C5
Ballonnen: RV52, RV55, RV66, V12, V15, V17, B91, B93, B95.
Planeten: R11, R17, Y15, Y17, B91, B93, B95, YG23, YG25


Toen mijn dochter vertelde dat ze weer een kinderfeestje had, vroeg ze gelijk of ik weer een tasje ging maken. En of ik daar dan weer de lichtgevende bolletjes op kon doen. Ze bedoelde hiermee de Nuvo Glow Drops in de kleur Apple Sour. Deze passen toch perfect bij dit thema, dus ik heb ze natuurlijk gebruikt.

De gefeliciteerd stempel is van Noor Design, en ik heb deze gestempeld met Versafine Onyx Black inkt.

Dit was het voor vandaag, ik hoop dat jullie het leuk vonden!

Liefs, Sandra

woensdag 28 maart 2018

Femke 6 jaar

Hoi allemaal,

Onze oudste dochter zit sinds januari op de basisschool en had onlangs haar eerste kinderfeestje. Nog niet eerder had ik erover nagedacht, dus toen ze vol trots met een uitnodiging thuis kwam, gingen bij mij de raderen draaien. Nadat ik zorgvuldig een cadeautje uit had gekozen, bedacht ik dat ik een tasje wilde pimpen, om het cadeau in te geven.

 Het tasje dat ik heb gebruikt, is een kraft tasje van Kimya. In mijn voorraad vond ik het papier Birthday Girl van Echo Park, perfect voor een jarige dame! ALle randjes zijn aangezet met Distress Ink Walnut Stain.


 De stempel die ik heb gebruikt, is van My Favorite Things, de set heet You're Super. Ook heb ik de bijpassende stans gebruikt. Ik heb haar met mijn Copic Markers gekleurd, ik gebruikte de volgende markers
Huid: E0000, E000, E00, E21, E11, E13
Haar: E42, E44, E47
Jurk: Y32, Y35, Y38
Cape en laarzen: RV53, RV55, RV58


 Bovenaan het tasje maakt ik van labels en een bannerpons vlaggetjes en maakte de naam van de jarige erop. Het lintje en de labels komen ook bij Kimya vandaan. Ook de doily achter de stempel komt er vandaan.


 Met stempelsets van Noor!Design, maakte ik de rest van de teksten erop. Verder veel verschillende bloemetjes van Wild Orchid Crafts en blaadjes, geponst met een Martha Stewart pons, maken het af.


Ook heb ik Nuvo Crystal Drops gebruikt, de roze zijn Carnation Pink, en de groene zijn Glow in the Dark drops, kleur Apple Sour. Ze zijn zo leuk, en ze "glowen"dus echt in het donker!

Dit was het voor vandaag. Ik hoop dat jullie het net zo leuk vonden als de jarige!

Liefs, Sandra

maandag 17 augustus 2015

Art by Mi Ran - Wishing you a Happy Birthday

Hi all!

It is my turn today to host the Art by Mi Ran blog, and I want to share a project I made with Primrose!

 The papers I used are from Wild Rose Studio, perfect for a bright and colorful card! I inked all the edges with Distress Ink Vintage Photo.


 The image is called Primrose, isn't she beautiful? I used my Copic Markers to color her, and I used the following. 
Skin: E000, E00, E21, E11, E13
Hair: W5, W7, 100
Eyes: YG95, YG97
Dress: V01 V12, V15, V17, BV000, BV00, BV02
Flowers: Y32, Y35, Y38, G82, G85
Bushes: G40, G43, G46
Wood: E35, E37
The clouds on the background are made with Distress Ink Tumbled Glass, a paint brush and a cloud template, made with a die from MFT.


 The sentiment I used is from Studio Light, and I used Versafine Onyx Black ink to stamp it.


The flowers are from Wild Orchid Crafts. I always use flowers as an embellishment, because I love them!!!

This was it for today, i hope you like it!

Hugs, Sandra

vrijdag 15 mei 2015

Slinky Tart - Hunting for Birdies

Hi all!

Time for me to post a new Slinky Tart creation! It's been a long time right? I switched from team A to team B, so I am back with posting Slinky Creations regularly.
Anyway, I decided to create a scene with the image I chose.


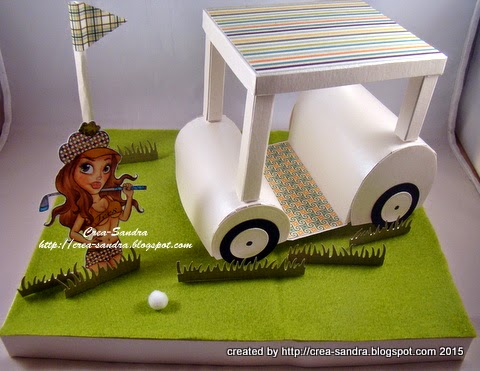
 I created a lovely box, with a scene on top! I decided to use this image, Hunting for Birdies, and thought it would go well with a golfcart. Next thing I knew was I was making a 3d golfcart, without any pattern or template!


The little patterned paper I used is from Echo Park. The bottom is covered with some green felt from my stash, and some extra grass is added from a My Favorite Things die.

 The image I used is Hunting for Birdies. I used my Copic Markers to color her, and I used the following.
Skin: E000, E00, E21, E11, E13
Blush and lips: R20, R22
Hair: E33, E35, E37
Clothes: YG95, YG97, YR23, YR27
Club: C2, C3, C5, B02, B05

I used a little chalk applicator as a golf ball and my scene is finished!

This was it for today, I hope you all like it!
Thanks for stopping by!

Hugs, Sandra

maandag 15 september 2014

Love to Create - Add some lines

***THIS IS MY SECOND POST FOR TODAY, PLEASE MAKE SURE TO SCROLL DOWN TO SEE THE FIRST!!! ***

Hi all!

How are you all doing? Hope you had a great weekend! Mine was not that good, I have been in bed with food poisoning all weekend... I must have eaten something wrong, cause both me and hubby were sick... :(
Anyway, I feel much better now, so time to bother you with a new challenge at Love to Create!! Our theme this week is Add some lines. Our sponsor for this challenge is Stitchy Bear! Just click on the banner below to go to the shop!


Stitchy Bear also generously provided some images to the DT to work with, and this is what I created.

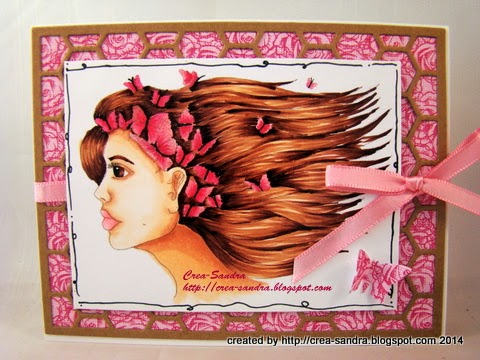
I printed the image quite large, so I kept the rest of my card pretty simple. I used some paper from Wild Rose Studio, and on top of that I used an MFT chicken wire diecut from kraft cardstock.

The image I used is called Butterfly Profile, from AliPeeps, who is one of Stitchy Bears' designers. The image can be found here. I used my Copic Markers again to color the image, and I used the following.
Skin: E000, E00, E11, E13 and R20 for the cheeks and lips.
Hair: E21, E23, E25, E27, E29
Eye: E23, E27
Butterflies: RV21, RV23, RV25, RV29
I also added some doodled lines around the image, to make my card match our challenge theme.
As a final touch I added a piece of pink ribbon, and I punched a butterlfy from the same paper as my background,

This was it for today, I hope you all like it. Please pop over to Love to Create and join us!

Hugs, Sandra

maandag 7 juli 2014

Love to Create - Fussy and Fancy OR Clean and Layered

Hi all!

We have a great new challenge at Love to Create, and this one totally fits my bill! Our theme is either Fussy and Fancy, or Clean and Layered. Our sponsor this week is Art by Mi Ran, and she is offering 3 images of the winner's choice! Isn't that generous? Just click on the banner below to go to the shop!
Artbymiran

Art by Mi Ran also generously offered some images to the DT to work with, and this is what I created.

 I decided to go for the Fussy and Fancy part of the challenge, which is quite close to my normal style. I made an easelcard, which I haven't done in ages! The papers I used are by Authentique.
The image I used is called Bubbly Betty, and can be found here. I used my Copic Markers again to color the image, and I used the following colors.
Skin: E0000, E000, E00, E11, E21, E13
Hair: YG91, YG93, YG95, YG97, YG99
Bubbles: BG0000, BG000, BG10
The ribbon I used is from my stash, and matches the purple in my papers perfectly! The lace was left over from a kit I bought last year. The hat pins I made myself. The chicken wire is made with a die from MFT.
The sentiment is made with my Noor!Design Scrabble Letters, I stamped them with Versamark ink on one of the solid patterned papers from the pack, and heat embossed them with white embossing powder. To finish off my card I used several Wild Orchid Crafts flower.

This was it for today, I hope you all like it. Please pop over to Love to Create and join us!

I would love to enter the following challenges:
Crafty Girls Challenge - Anything goes
Crafting at the Weekend - Anything goes
Aud Sentiments - Anything goes
Sassy Studio Designs - Easel Cards
Open Minded Challenge - Water everywhere
Suzy Bee's Blooming Challenge - Anything goes
Time 4 Scrap - Anything goes
Scribble and Scrap - Anything goes

Hugs, Sandra

dinsdag 24 juni 2014

Crea-Sandra's Crafty Tutorial World - Making clouds behind a colored image

Hi all!

Today I would like to show you how to make a background of clouds behind your colored image.

Supplies:
Image from Robyn's Fetish - Play Ball (printed twice)
Removable adhesive
Distress Ink Tumbled Glass
Paint Brush
Cloud template. I used a die from MFT, but you could also hand draw it)
Coloring medium of your choice ( I used Copic Markers)
Other supplies to finish your card, like papers and embellishments


Color one of your images the way you want.
Copic Markers used:
Skin: E00, E11, E13
Hair and bat: E23, E25, E27
Clothes: W00, W0, W2, W5
BG72, BG75, BG78
R24, R27, R29
Grass: YG91, YG93, YG95, YG97, YG99


This is how my colored image looks. Also make sure you cut down your paper to the size you want to use on your project.


Take your second image and cut it out. If there are any parts that have to be cut out (like between the legs), it is the easiest to do this first. 


Trim your image, and coat the back with a removable adhesive.


Mask off your image by covering it with the second image. As you can see the grass ins't covered but that is no problem at all.


Cut your cloud template.


Take your template and put it on your image. Always start from the bottom and work upwards. Take your brush and pick up some ink.


Start sponging by tapping your brush along the edge of your cloud template.


This is how the first part looks. It is quite hard to see now because there is not so much ink, but the further you go, the better you can see. 


Take your template a little bit higher, and sponge again with your brush. Always pick up ink before starting sponging.
Your template is not symmetric, neither are clouds. Take another part of the template, or put your template on a slight angle for different shapes.
Always make sure you do small sections, so the first part I did was the lower left side, below the bat. Once that area is finished you can start with a new area.


Start sponging in the new section, and just start at the lowest point and work your way up.


Now the complete left side is finished, except the part above his hat. You always have to start at the bottom, so now we are starting in the lower right area.


This is the finished piece.


Gently peel off your mask.


Here is how the finished image looks. Quite nice, right?


Here's my finished card.


This was my tutorial, I hope you like it. It is an easy way to give something more to your colored image.

See you next time!

Sandra