Pagina's

zondag 23 juni 2013

Robyn's Fetish Challenge 165 - Pink, Scallopes, A border and a bow

Hi all!

Welcome to a new challenge at Robyn's Fetish! This week we have a recipe challenge, and even though that is not one of my favorites, this one was pretty easy though!
What is the recipe, you ask? Well, PINK, SCALLOPES, A BORDER AND A BOW!
Told you it was easy!

We also have a fabulous sponsor this week! We are sponsored by Digi Stamp Characters, and they are offering 3 digi stamps of the winners choice from her Etsy shop or her homepage!


Digi Stamp Characters also generously sponsored some images to the DT to work with and this is what I created.
I made a scalloped round easelcard, and I used my Nestabilities dies for it.
The image I used is called Pure Innocence 030, and can be found here. I used regular coloring pencils to color my image, and some liquid pearls for the background.
The designer paper is shocking pink, from a My Minds Eye Paper Pad. I also used a piece of green designer paper to make a border. The pink ribbon I used is from my stash, and I made a bow with it.

That was it for today, I hope you all like it! Now hop over to Robyn's Fetish and join us!

Hugs, Sandra

Robyn's Fetish is sponsoring Cupcake Inspirations Challenge - GDT post

Hi all!

Robyn's Fetish is sponsoring Cupcake Inspirations for its current challenge, and I was asked to be their Guest Designer on behalf of Robyn's Fetish.

This is the inspirational pic for this challenge
 
It is a color challenge, and this is the project I made.

I made a little gift bag in the required colors.
The image I used is by Robyn's Fetish and is called Daisy Days, and can be found here.
I used my Copic Markers to color the image and I used the following markers.
Skin: E50, E51, E53
Hair: E27, E29
Pinks: R81, R83, R85
Turquoise: BG11, BG13, BG15
Lavender: BV02, BV04, BV08
 
I made a little tag for the sentiment and I used some bakers twine to attach it to the handle of the bag.
 
That was it for now, I hope you like it.
 
Now pop over to Cupcake Inspirations and join them!
 
Hugs xx Sandra

vrijdag 21 juni 2013

Crea-Sandra's Crafty World Tutorial at Robyns Fetish - Arranging flowers on a card

Hi all!

This is the tutorial I made for Robyn's Fetish today!

Welcome to a new tutorial, I am going to show you how I arrange paper flowers on my cards.

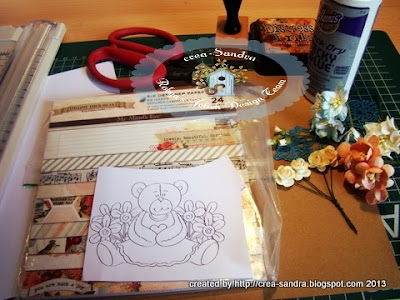
Supplies

Paper flowers in different sizes. I used gardenias, cherry blossoms, lilies, roses and rosebuds.
Tim Holtz scissors
Tacky glue
Designer paper, I used My Minds Eye
Robyn's Fetish image Ms. Cutie Bear
Kraft card stock
Card base from white card stock
Distress Ink
Lace
Score and fold your card base in half
Cut a piece of kraft card stock slightly smaller than your card base. I usually cut 1/8 inch smaller
I cut 5 pieces of designer paper to cover up the kraft card stock
If you want, this is the moment to distress the edges of your papers.  I like to use Distress Ink Vintage Photo for this, because the color matches the designer paper I used. After inking, you can adhere the papers to the kraft piece. Do not adhere it to the card base yet.
Cut a piece of lace and wrap it around the card front.
I always use some acid free tape to adhere my lace to the back of my card front.
Color your image and cut it out.


I used my Copic Markers to color the image and I used the following markers.
Bear: E21, E23, E25, E27
Dress: BG11, BG13, BG15
Flowers: R20, R22, R24
Stems: G43, G46

I adhered the image to a piece of kraft card stock and adhered that to the card front with dimensional adhesive. I also adhered the card front to the card base. If you adhere your flowers to the card front first, it might be hard to adhere the front to the base, so I like to glue them together now.
Pick the flowers you want to use. I usually use one big flower as a center piece, and let the size go down. That is why I started with the gardenia, because it is the biggest flower.
I always use my Tim Holtz scissors to snip the stems off my flowers. Removing them is the easiest way to adhere the flowers to your card.
Personally I like symmetry in my flower piece, so I came in with some cherry blossoms because they are a bit smaller than the gardenias. Next to the cherry blossoms I used some lilies.
While snipping the stems, I always lay the flowers down on my card so I can see what I need next.
To finish my flower piece, I like to give it some length. I used some closed rosebuds for this but you can also use some tulips for it.
I always use two rosebuds on each side, because they are a bit small. By using the stems in different lengths, you can create some more dimension to it.


When I am happy with the result I start adhering the flowers to my card. I always use Tacky Glue for it, because it dries fast and your flowers will never come loose. You don't have to use a big amount of glue, just a little dot is enough.
When adhering a flower, I like to press it down for about five seconds to make it stick really good.
Before I adhere the cherry blossoms, I like to squeeze them a bit, so there are no gaps between the gardenia and the cherry blossom.
For the lilies, I used some glue on one of the petals so they can be adhered to the card more easily.
After adhering the lily, it looks like this.
Now it's time to adhere the closed rosebuds. I like to cover the stems in glue so they stay in place.
Now you can finish the other side of the flower piece.
This is how my card looks at this moment. I think the bottom right corner looks a bit plain.  I am not happy with how it looks. This shows you that you need some balance in your card and that is why I am going to add some flowers to the bottom right corner.
When creating a second flower piece, I never make it as big as the main piece. Usually I don't use more than three flowers. I lay them down first to see how it looks before adhering them.


 When I am happy with the result, I adhere the flowers to the card. In this picture you can see that I didn't use two lilies. I replaced one with a little rose.


Now let me show you the result of the card.  
I hope this gave you a good impression on how to arrange flowers on your card. I know there are probably a million ways to arrange them but I like this the most.
Thanks for stopping by!  I hope you give it a try!
Sandra

zondag 9 juni 2013

Robyn's Fetish Challenge #163 - Die Cuts or Punches

Hi all!

Time for a new challenge at Robyn's Fetish! This week we want to see some die cuts or punches!

We also have a fabulous sponsor for this challenge, Whoopsi Daisy is offering 3 image sheets from their store to the winner! How generous is that!
Just click on the banner to go to their shop!


Whoopsi Daisy also generously offered some images to the DT, and this is what I created with it.
 
For this card I created my own background paper as I didn't have anything in the colors I wanted. I used a Hero Arts background stamp, and stamped to some white cardstock with VersaMark Ink. Then I used PanPastel in red and yellow and covered the entire cardstock with it. You can keep blending or adding colors until you are happy with the result. When you are done with your background, you have to use a fixative spray so you can't smear it anymore, but regular hairspray will work too.
Like I said, the image is generously sponsored by Whoopsi Daisy and is from sheet 406. The image can be found here. I used my Copic Markers to color the image and I used the following colors.
Skin: E50, E51, E53
Hair: E74
Dress: R24, R27, R29
Hat: Y11, Y15, Y17
The image is cut out by hand and I used a doily behind it to make it stand out more from the background.

I used a Nestabilities Labels 4 die and I used my Cuttlebug Swiss Dots embossing folder on it. The embossed parts and the edge of my die cut are inked with Distress Ink Brushed Corduroy. The I cut the die-cut in half and punched some eyelets in them. I used some red twine to tie them together. The red ribbon I used is from my stash.
The sentiment is by Whimsy Stamps and punched out with a circle punch.

That was my card for today, I hope you like it! Now hop over to Robyn's Fetish and join us!


Hugs, Sandra

Congratulations on your graduation! - Red Carpet Studio Challenge

Hi all!

Welcome to a new challenge at Red Carpet Studio! This week it's the Card Design Teams turn to host a challenge, so we want to see some cards!
This week we are inspired by the movie The Graduate, so we want to see some graduationcards! Perfect for this time of the year!

We also have a fabulous sponsor for this challenge, QKR-Stampede is offering 5 images of the winners choice! That is so generous!
Just click on the banner below to go to their shop!


Before I show you my card, I must tell you, it's pretty Clean & Simple, so do not be too shocked, I warned you!
Clean and Simple is totally not my style, but I like how this turned out! I was quite inspired by a lot of CAS cards I saw recently and I wanted to try it out.
The image I used is by Mo Manning, and is perfect for this challenge. This graduation girl is colored with my Copic Markers, and I used the following markers.
Skin: E50, E51, E53
Hair: E55, E57
Clothes: C3, C5, C7
Shoes: R27, R29
I embossed my cardfront with a Cuttlebug embossing folder, and used some red ribbon from my stash.
The image is matted on some black cardstock, and the sentiment is heat embossed with white embossing powder. The sentiment is from the Congratulations sentiment set by AmyR, and I adore all her sentimentsets!

That was it for today, I hope you all like it! Now pop over to Red Carpet Studio and join us with your graduatution cards!

I would love to enter the following challenges:
A Gem of A Challenge - Emboss it
QKR Stampede - Ribbons & Bows

Hugs, Sandra

vrijdag 7 juni 2013

1 year anniversary at Digi Haven!!!

Hi all!!

Does time fly? Well, this post is proof it does!! We are celebrating our first anniversary at Digi Haven! Even though I missed the first couple of challenges, I really feel like I am celebrating my first anniversary there too!!

There are lots of fabulous sponsors for this lovely challenge, which has the easiest theme of them all
ANYTHING GOES!!!

Check out the Digi Haven blog for all our sponsors and the prizes they are offering!

This is my project for this challenge!
Mhuahahahahaha, when I saw this pig celebrating, I knew I had to use it for this challenge! The image is generously sponsored by Beccy's Place. He is called Party Pig, and can be found here.
Let me show you a close-up!
This pig is colored with my Copic Markers, and I used the following
Pig: W00, W0, W2, W5
Hoofs: W5, W7
Accessories: BG05, BG07, BG09, Y15, Y17, R24, R27, R29
I used one of my oval dies to cut the image out, and I used the matching scalloped die to create a little border around it.
The papers are by My Minds Eye. I used one of the more solid patterns to use my BRAND NEW Bingo Stamps. They are stamped with Versamark Ink and heat embossed with white embossing powder.
To finish my card I used some paper roses from my stash and some blue rhinestones!

This was it for today, I hope you like it! Now hop over to Digi Haven and celebrate with us!!!

Hugs, Sandra

maandag 3 juni 2013

It's a special day!

Hi all,

I have some exciting news to share with you today! This month I am guest designer for Eureka Stamps!

This weeks theme is WEDDING and this is what I created
The card is made with some Creatables dies. I only used red and white cardstock.
The image is a digi by Eureka Stamps. Some of the hearts are colored with a red marker, and covered with Stickles. The other blank hearts are covered with Glossy Accents. I also used some liquid pearls in cream color.
The sentiment I used is also by Eureka Stamps, and is perfect for a wedding!
As you can see I used some StampinUp! Whisper White ink for the embossed parts of the diecut.

That was it for today, I hope you like it! Now pop over to Eureka Stamps and join us!

Hugs, Sandra

zondag 2 juni 2013

Robyn's Fetish Challnge #162 - Use a Digi


Hi all!

Time for a new challenge at Robyn's Fetish! It is an easy one (do we ever have hard challenges???)
USE A DIGI! not that hard, right?

Robyn's Fetish is also our sponsor for this week, and she is offering 3 images of the winners choice! Just click on the banner below to go to their shop!
ROBYN'S FETISH DIGITAL STAMPS

Robyn also generously provided some images to the DT to work with, thanks so much!
This is what I created!
I made a little pocketcard, that contains a recipe for Grandma's Cookies. I always love my Grandma's Cookies, and I'm lucky she's still able to make some every now and then!
The digi I used is called Granny's Cookies, and can be found here. I colored this lovely Granny with my Copic Markers, and I used the following.
Skin: E00, E02
Hair: C1, C3
Shirt: W00,W0, W2, W5
Skirt: RV91, RV93, RV95
Apron: YG91, YG93, YG95
Plate: C1, C3
Cookies: E55, E57
The image is cut out by hand, and I used some dimensional adhesive to adhere her to the card.

Here is the recipe. I have actually never made it, I found it online, but I will have to try it out some time! Except I am not going to use walnuts, because I am sooo allergic, I will end up in the ER after eating...The papers I used are by Teresa Collins. They were free with a magazine I bought recently.

That is it for today, I hope you like it!
Now pop over to Robyn's Fetish and join us!

Hugs, Sandra